
Before you start
Make sure the basics are covered:
Confirm the charging port on the headset is clean and free of debris.
Check your charging cable for damage or loose connectors.
Try a different USB-A or USB-C cable (depending on your model).
Plug into a known-working power source (wall adapter, PC port, or powered hub).
Step 1: Let the battery fully drain
Allow the headset to sit for 48 hours so the battery can drain completely.
Once fully drained, move to the hardware reset.
Step 2: Perform a hardware reset (supported models only)
These models include a reset switch: Arctis 1 Wireless/A1W Xbox, Nova 3 WL/3P/3X, Nova 5/5P/5X, Arctis 7/7P/7X, Nova 7/7P/7X, Arctis 9/9X.
(This does not apply to Arctis Pro Wireless.)
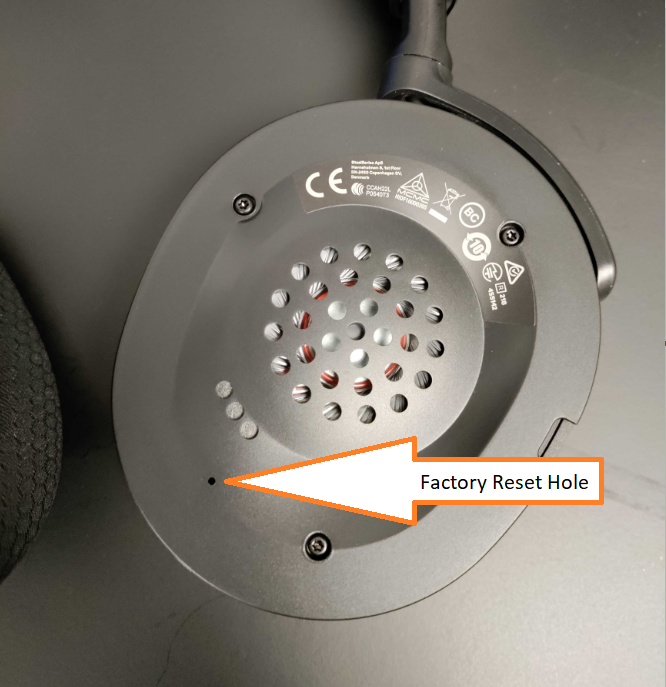
How to reset your headset
Locate the reset pinhole under the ear cushion (location varies by model).
Use a paperclip or pin to press and hold the button for the required duration.
Release the button and power the headset back on.
Reset locations by model
Arctis 1 Wireless (A1W)
Location: Under the left ear pad (microphone side).
Hold time: A few seconds.
Arctis 1 Wireless reset button location under the left ear pad.
Nova 3 WL / 3P WL / 3X WL
Location: Under the left ear cushion.
Hold time: ~2 seconds.
Nova 3 WL reset pinhole under left ear cushion.
Nova 5 / 5P / 5X
Location: Under the right ear cushion.
Hold time: ~2 seconds.

Nova 5 reset pinhole under right ear cushion.
Arctis 7 / 7P / 7X
Location: Under the left ear cushion.
Hold time: ~2 seconds.
Arctis 7 reset pinhole under left ear cushion.
Nova 7 / 7P / 7X
Location: Under the right ear cushion.
Hold time: ~1 second.
Nova 7 reset pinhole under right ear cushion.
Arctis 9 / 9X
Location: Under the ear cushion on the non-mic side.
Hold time: ~2 seconds.
Arctis 9 reset pinhole under ear cushion (non-mic side).
Step 3: Try another charging setup
If the reset didn’t help:
Use a different micro-USB or USB-C cable (model-dependent).
Try another power source (PC, wall charger, console USB port).
Leave the headset plugged in overnight.
- If any of the above instructions do not work, please click here for further support.